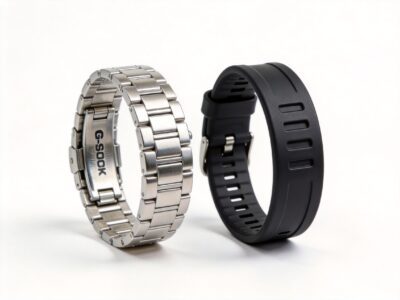
Installing a GA2100 bezel is one of the most impactful modifications you can make to your CasiOak. This comprehensive step-by-step tutorial will guide you through the entire process, from gathering tools to the final waterproof test.
What You Will Need
Before starting your GA2100 bezel installation, gather these essential tools:
| Tool | Purpose | Estimated Cost |
|---|---|---|
| Spring bar tool | Remove/install spring bars | $8-15 |
| Case back opener | Open watch case | $10-20 |
| Tweezers | Handle small parts | $5-10 |
| Microfiber cloth | Protect watch surface | $3-5 |
| Double-sided tape | Secure bezel insert | $2-5 |
| Isopropyl alcohol | Clean surfaces | $3-5 |
Total estimated cost: $30-60 for a complete starter kit.
Step 1: Prepare Your Workspace
A clean, well-lit workspace is essential for a successful bezel installation:
- Choose a flat, stable surface with good lighting
- Use a white or light-colored mat to see small parts easily
- Keep a small container nearby for screws and small parts
- Have your microfiber cloth ready to protect the watch
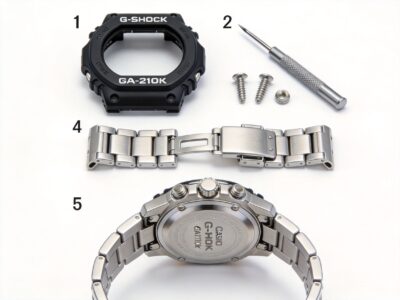
Step 2: Remove the Original Bezel
Removing the factory bezel requires patience and the right technique:
- Remove the spring bars: Use your spring bar tool to release the strap from the watch case
- Identify bezel tabs: The GA2100 bezel is held by small tabs around the case
- Use the case opener: Gently insert the tool under the bezel edge
- Work around the case: Apply gentle, even pressure to release all tabs
- Lift off the bezel: Once all tabs are released, carefully remove the bezel
Important: Never force the bezel. If it does not come off easily, double-check that all tabs are released.
Step 3: Clean the Case
Before installing the new bezel, thoroughly clean the case:
- Use isopropyl alcohol and a lint-free cloth
- Remove any adhesive residue from the old bezel
- Check for dust or debris in the bezel groove
- Ensure the case is completely dry before proceeding
Step 4: Prepare the New Bezel
Unbox your new bezel and inspect it carefully:
- Check for any defects or damage
- If the bezel has an insert, ensure it is properly seated
- Apply double-sided tape to the bezel ring if required
- Remove any protective film from the bezel
Step 5: Install the New Bezel
Now comes the critical part – installing your new bezel:
- Align the bezel: Position the bezel over the case, ensuring the 12 o’clock marker is aligned
- Start with one tab: Press down gently on one side to engage the first tab
- Work around the case: Apply even pressure around the bezel to seat all tabs
- Listen for clicks: You should hear/feel each tab clicking into place
- Check alignment: Rotate the bezel to ensure it moves smoothly and is properly aligned
Step 6: Waterproof Testing
After any modification, waterproof testing is essential:
- Visual inspection: Check that all seals are properly seated
- Dry test: Submerge in shallow water and check for bubbles
- Pressure test: If available, use a pressure tester for accurate results
Note: Even with proper installation, water resistance may be reduced. Consider having your watch professionally pressure tested.
Common Mistakes to Avoid
- Forcing the bezel: This can damage both the bezel and the case
- Skipping the cleaning step: Dirt and debris can prevent proper seating
- Ignoring waterproof testing: Always test after modification
- Using incorrect tools: The wrong tools can scratch or damage your watch
- Rushing the process: Take your time for best results
Troubleshooting Guide
| Problem | Solution |
|---|---|
| Bezel will not snap into place | Check that all tabs are aligned; clean any debris from the groove |
| Bezel rotates too loosely | The bezel ring may be worn; consider replacing or adding a thin shim |
| Bezel is misaligned | Remove and reinstall, paying careful attention to the 12 o’clock position |
| Visible gap between bezel and case | The bezel may not be fully seated; press firmly around all edges |
Frequently Asked Questions
Can I install a bezel without special tools?
While possible, we strongly recommend using proper tools to avoid damaging your watch. A basic tool kit costs under $30 and is a worthwhile investment.
Will installing a new bezel void my warranty?
Yes, most manufacturers will not honor warranties on modified watches. Consider this before proceeding.
How long does the installation take?
For beginners, allow 30-60 minutes for the entire process. With practice, you can complete it in 15-20 minutes.
Can I swim with my modified GA2100?
After proper waterproof testing, many modified watches retain their water resistance. However, we recommend professional pressure testing before water exposure.
Recommended Bezels for GA2100
Here are some popular bezel options for your CasiOak:
- Metal bezel kits: For a premium, Royal Oak-inspired look
- Color-matched bezels: Perfect for a stealth or tactical style
- Custom printed bezels: Unique designs for personalization
- Carbon fiber style: Lightweight with a modern aesthetic
Next Steps
After successfully installing your new bezel:
- Consider complementary modifications like a negative display or custom strap
- Share your build on Reddit communities like r/casioak or r/gshockmodification
- Check out our other guides for more G-Shock customization ideas
Related Guides
- G-Shock Modification Guide: Complete 2026 Tutorial
- GA2100-1A1 Modification Guide
- G-Shock Mod Tools: The Ultimate Kit for Beginners
Image/Video Placeholder: Add step-by-step photos showing bezel removal, cleaning, and installation process. Include a before/after comparison image.
Found this guide helpful? Share it with the community and check out our other CasiOak modification tutorials!